Saturday, May 30, 2009

153. Malaysian-Style Chicken Curry (p. 359)

Like a lot of people, when I go to Thai restaurants, I often go with the old standby, and order Pad Thai. Recently, I've ventured further afield in the menu choices, and I've become a fan of various curry dishes, especially green curry.

This recipe, from Malaysia, Thailand's neighbor to the south, reminded me of some of the better curries I've had at Thai restaurants.

First, I roughly chopped a whole lot of shallots, some garlic and ginger root. I pureed all of these ingredients in the food processor with a little bit of water to make a paste. A very pungent paste! When I took the lid off the food processor, the "fumes" from the shallots and garlic filled the kitchen and made my eyes water a little bit.

Next, I browned some boneless, skinless chicken breasts in my large Dutch oven. I transferred the browned (but not yet completely cooked) chicken to a plate. I turned the heat down and added the shallot/garlic/ginger paste, cooking for a bit and adding some curry powder. I returned the chicken to the pot and added a can of coconut milk and chicken broth. I also added a whole jalapeño chili, which I had made four slits in. Presumably, as the curry simmers, the jalapeño's heat gets infused into the sauce. I also added a cinnamon stick and one whole clove. The Book calls for one star anise, but my wife couldn't find any at the grocery store. She brought home some anise seed instead. At first, I said, it's not the same, but then I checked The Cook's Thesaurus, and learned that a 1/2 teaspoon of anise seed and a pinch of allspice will approximate a single star anise. I simmered it all together for a while until the chicken was cooked through. Then I took out the chicken and simmered the sauce for a bit longer to thicken. When I was done, I served the chicken and sauce over rice and sprinkled it with some fresh clinatro.

This is one of the best meals I've made from The Book so far. The chicken was so tender and flavorful. The sauce was fragrant and delicious. The coconut milk gave it just a touch of sweetness and a rich, velvety texture. The jalapeño and the other spices gave the dish a multi-layered flavor with just the right amount of heat (OK, I wouldn't have minded just a bit more heat). Even the cilantro on top wasn't just for looks. It perfectly finished off the dish with a bright clean note.

This dish remineded me of an excellent green curry that I get at a local Thai restaurant called Sweet Basil in Andover, Massachusetts. I will certainly make this dish again. It's a real keeper.

Date Cooked: May 17, 2009
Degree of Difficulty: Medium
Rating: A

Thursday, May 28, 2009

152. Prosecco and Summer Fruit Terrine (p. 811)

When I first flipped through The Book, I spotted this recipe and decided that it would be a perfect Mother's Day dessert, so I filed it away in my memory bank. Well, this Mother's Day, we had a party for my son's dedication ceremony, and this fruit terrine fit in just right with the lunch buffet, and it was a nice alternative to the cake that we got from the bakery down the street.

First, I arranged four cups of mixed fruit in a 1 1/2 quart glass loaf pan. The Book suggests berries, peaches and grapes. I planned on using blueberries, peaches and white seedless grapes. It used to be that you could only get fresh "summer fruit" in, well ... summer. But, these days, you can get pretty much anything at pretty much any time. For the past few weeks, I've seen fresh peaches at my usual grocery store. But, of course, when I did my shopping for this recipe ... you guessed it, no peaches. (And, wouldn't you know it, the next week, they had hundreds of fresh peaches! Go figure.) So, with no fresh peaches, I had to improvise. I scanned the produce section to try to find a combination of fresh fruit that would go well together with each other and the prosecco. I wasn't really happy with any of the options, so I decided to go with canned peaches. I also decided to use some canned pears, too.

Next, I sprinkled some unflavored gelatin over some prosecco and let it stand for a little while in a small bowl. Then I boiled some more of the prosecco with some sugar and mixed it until the sugar is dissolved. I took it off the heat and added the gelatin mixture and stirred until dissolved. I added yet some more prosecco and some lemon juice and transferred the whole thing to a metal bowl set over a larger bowl full of ice. I allowed the mixture to cool to room temperature, stirring every now and then. This sounds like a lot of steps, but it was really easy and only took a few minutes.

I carefully poured the prosecco/gelatin/sugar mixture over the fruit, covered it with plastic wrap, and put it in the refrigerator overnight to set (The Book says that it needs at least six hours to set). The next day, just before serving, I unmolded the terrine by dipping the glass loaf pan in a larger pan of hot water to loosen it. It took a few tries, but eventually, the terrine slid out of the pan and onto the serving plate.

This dessert makes a stunning presentation. It is a colorful, mosiac of jewel-like fruit. Unfortunately, I wasn't as impressed with the serving and eating. First, there was so much fruit in the terrine and not enough of the prosecco gelatin that it didn't really keep its structural integrity when sliced. It wasn't a matter of the gelating not setting, it's just that there wasn't enough of it to hold the slices together. But worse, the flavor was only ho-hum. I had such great expectations for this dessert, and it didn't really live up.

Date Cooked: May 9, 2009
Degree of Difficulty: Easy
Rating: B+

Monday, May 25, 2009

151. Hummus with Toasted Pine Nuts, Cumin Seeds, and Parsley Oil (p. 14)

The Book introduces this recipe by saying that "Hummus is so common these days it's become almost pedestrian." To me, this sounds a bit snobbish. It's kind of like those hipsters who claim not to like bands like Coldplay now that they have top-selling albums and sell out big arena shows. If you liked the band before they were popular, it's OK to keep on liking them once everyone else catches up to your superior trend-spotting skills. You don't have to apologize for liking something that everybody else likes. And you certanly don't have drizzle parsley oil all over your Coldplay CD and sprinkle toasted pine nuts, cumin seeds and parsley on it. You'll just wreck it.

At its core, this is just a basic recipe for very good hummus. First, I whizzed together some canned chickpeas and garlic in the food processor. Then I added some well-stirred tahini paste, water, lemon juice, olive oil, salt and more chickpeas, and whizzed it all together until it was smooth. Delicious! This is where I'll stop the next time I make this recipe.

The rest is all gilding the lily, especially when you do it all at the same time. Any one of the following accouterments on its own might be a nice little change, but all together, it's a bit much.

First, I blended equal parts of olive oil and chopped parsley in the blender. I poured this into a fine-mesh sieve and pressed the bright green oil from the solids. This parsley oil was was really good. It had a very fresh, almost grassy flavor. I'm sure that I'll find a use for this in some other dish that I make somewhere along the way.

Next, I toasted some pine nuts and cumin seeds in the oven. Toasting nuts and seeds is alwys dicy. They go from toasted to incinerated in the blink of an eye. The pine nuts were just a smidge "toastier" than I would have liked, but they were OK.

I sprinkled the toasted pine nuts and seeds over the hummus and dirzzled the parsley oil over the top. I didn't even take the last sept of scattering parsley leaves over the top of the whole thing. It was all just too much. This is an excellent basic hummus recipe. All of the "tarting-up" is good, but completely unnecessary. I just think that the editors of Gourmet "out-Gourmet-ed" themselves on this one.

Date Cooked: May 9, 2009
Degree of Difficulty: Easy
Rating: A-

Saturday, May 23, 2009

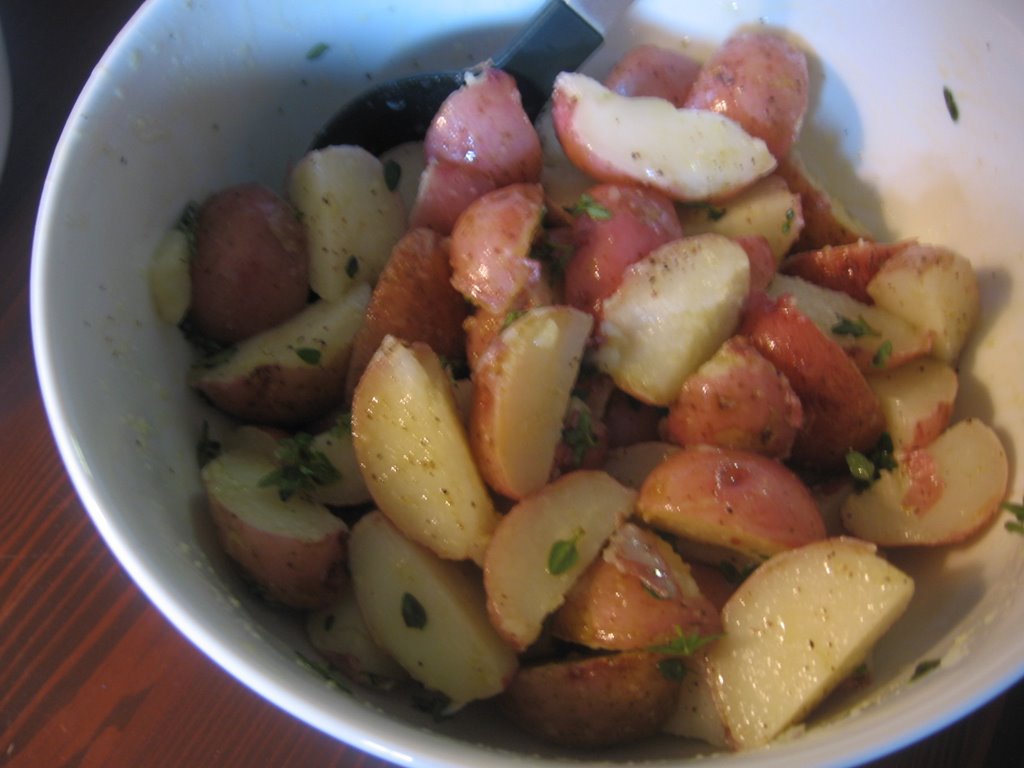
150. Potato and Thyme Salad (p. 148)

I made this potato salad as part of the lunch buffet for my son's dedication ceremony celebration on Mother's day. I was looking for an easy, make-ahead side dish that would go with the marinated turkey breast that I was making, and that would work with my wife's current dietary restrictions (no dairy, soy or wheat). This fit the bill.

The Book says that this is "no suburban backyard potato salad." Instead, this recipe,* which comes from the Ballymaloe Cooking School in Ireland, is simple, understated and totally unfussy. It's so simple that there are only three ingredients: small red boiling potatoes, fresh thyme leaves, and olive oil (plus salt and pepper to taste).

First, I washed and dried some fresh thyme. I plucked the leaves and buds off the woody sprigs. This what kind of tedious, but not too hard since you can sort of zip the leaves off the sprigs by running your fingers against the direction that the leaves grow. Once I had gathered a respectable amount of leaves, I put them in a little bowl and set them aside.

Next, onto the potatoes. I washed them well and put them (whole) into a pot of salted water. The Book says to cook the potatoes for 15 to 20 minutes until "just tender." I've had my fair share of undercooked potatoes (they're pretty much inedible) so, I made sure that they were good and tender. In retrospect, I wish that I had taken them off the heat just a little bit sooner, since what you're looking for here are potatoes that are cooked, but still just the slightest bit on the firm side.

After the potatoes had cooled just a bit, I cut them into quarters, sprinkled them with the thyme leaves, drizzled on the oil and tossed to coat. I seasoned it with some salt and pepper, and that was it.

My wife didn't like this dish at all. She called it "the worst potato salad I've ever had," and demanded that I give it a "C" rating. (Geez, tell me how you really feel.) I didn't have quite as negative reaction to this recipe. I just thought that it was kind of "meh." I suppose that "understated" and "boring" are two ways to look at the same thing.

(Oh, by the way, in all of the hustle and bustle of getting ready for the lunch, I forgot to take a picture of this dish. The photo at the top of this post comes from Teena's blog. I hope she doesn't mind me borrowing her picure ... because I'm going to do it again with my next post, too.)

Date Cooked: May 9, 2009
Degree of Difficulty: Very easy
Rating: B-

* This recipe is not on epicurious.com.

Tuesday, May 19, 2009

148. Poached Whole Turkey Breast (p. 386) and 149. Lemon-Marinated Turkey with Golden Raisins, Capers and Pine Nuts (p. 383)

This is the first of several posts about food that I made for a lunch buffet for my son's dedication ceremony on Mother's Day. Since the ceremony was on a Sunday morning, and lunch was going to follow immediately afterward, I wanted to make things that I could cook ahead, and that could be served cold.

This recipe for poached whole turkey breast, and this recipe for serving the poached turkey in a lemon marinade* seemed like the perfect choice for a cold lunch buffet.

First, I made the poached turkey breast. I started with a seven-pound fresh whole turkey breast from Raymond's Turkey Farm just down the street from my house (here's to locally-produced food!). I put the turkey breast in my biggest stock pot, which as it turns out isn't that big after all. I filled the pot up to the brim with water and it barely covered the turkey. It looked even more like the Loch Ness Monster than Melissa's turkey. The creepy Scottish loch vibe continued as the water, which was precariously close to the top of the pot, kept boiling over as the turkey cooked. Anyway, I added some chopped carrots and onion along with some vinegar, bay leaves, salt and peppercorns. The Book says to simmer for 1 1/4 hours, but because my turkey was a bit larger than the five- to six-pound breast called for, and because I'm unreasonably afraid of undercooking poultry, I cooked it for about 1 3/4 hours. Then I let it cool in the cooking liquid for about a half hour before draining it, removing the skin and bones and cutting the breast into two large pieces for the marinated turkey dish. (I was also able to pick a good amount of meat off the bones, which I chopped up and made into a simple turkey salad. Pretty good!)

Next it was on to the marinade. I soaked some golden raisins in some boiling water to plump them up. Meanwhile, I took the zest off a couple of large lemons with a vegetable peeler, and squeezed the juice from the lemons. I whisked the juice together with some balsamic vinegar, salt and pepper, and quite a bit of olive oil. I mixed in the zest, raisins and some capers which I had drained and rinsed. I poured the marinade over the turkey, which I had placed in a large bowl. I marinated the turkey overnight, turning it a few times.

The morning of the ceremony, I sliced the turkey and arranged it on a platter. I strained the marinade and sprinkled the zest, raisins and capers over the turkey along with some pine nuts that I had toasted and some chopped parsley and mint. Finally I drizzled the marinade over the turkey, wrapped it tightly with plastic wrap and put it in the refrigerator until lunch.

This was a very nice way to eat cold turkey. The marinade was delicious with a nice interplay of the different flavors of the zesty lemon, the sweet raisins and the salty capers. The pine nuts gave the turkey a nice toastiness and crunch, and the chopped herbs contributed a light freshness. There's a lot going on here, but it didn't seem like too much. The only thing that there was a little too much of was the olive oil. The marinade did seem just a little bit greasy. But over all, I liked it, and it got good reviews from our guests.

The dedication ceremony was very nice. It was also very touching to mark this special occasion on my wife's first Mother's Day, and to visit with my parents (up from Pennsylvania), and the rest of my and my wife's families.


Date Cooked: May 9, 2009
Degree of Difficulty: Easy
Rating: B+

*Neither of these recipes are on epicurious.com

Saturday, May 16, 2009

147. Shrimp in Adobo Sauce (p. 322)

I decided to make one of The Book's Mexican dishes in honor of Cinco de Mayo.

The Book says that this recipe* is from Elisabeth Lambert Ortiz, who was a frequent contributor to Gourmet. She was also the British-born wife of a Mexican UN diplomat, who along with others like Diana Kennedy, is credited with introducing many British and American cooks to Mexican and Latin American food in the 1950s and 1960s.

The foundation of this recipe is the adobo sauce made with dried ancho chiles. Before I get to the chiles, I just have to comment that the term "adobo sauce," as used in the name of this recipe and on cans of chiplote peppers "in adobo sauce," is redundant since "adobo" can mean "sauce" in Spanish. So, saying "Shrimp in Adobo Sauce" is like saying "Shrimp in Sauce Sauce." That just gets on my nerves, like saying "ATM machine" (automated teller machine machine) or "PIN number" (personal identification number number).

Now that I've got that off my chest, back to the "sauce sauce." As I was saying, the sauce is made with dried ancho chiles, which I swear I've seen at my usual grocery store. But of course when I did my shopping for this recipe, there were no anchos to be found. So, I bought some Aji Panca Seco (dried red peppers) and decided to take my chances. Just to be safe, I decided to look my peppers up on the internet, to make sure that they weren't atomiclly hot on the Scoville Scale. I found this cool website called The Cook's Thesaurus which has all kinds of helpful information about food substitutions. I'll use this site again for sure. The Cook's Thesaurus says that ancho chiles (at right) are dried poblano chiles. The Book says that they are sweeter and milder than many other dried chiles. Aji panca chiles (at left) are described as fruity and mild, so I figured that it just might work out OK.

First, I toasted the dried chiles in a hot cast iron skillet for just a couple of seconds on each side. I was really surprised what a difference this made. That little bit of heat made the brittle dried peppers pliable enough to slice open and remove the stems, seeds and veins. Then I broke the chiles up into small pieces and soaked them in some warm water for about a half an hour.

Then I drained the chile pieces and put them into the blender with some garlic, onion and oregano. The Book says that Mexican oregano is preferred for this recipe. The Book's glossary explains that Mexican oregano is not oregano at all, but rather a relative of lemon verbena. Apparently, it tastes like regular oregano without the bitterness. But, after spending $16 on cardamom pods for my Garam Masala, I had already blown my spice budget for the time being, and I decided to go with regular oregano. I blended all of these ingredients with a little bit of water until it was a thick puree.

Next I heated some olive oil in a skillet and added the sauce, cooking it for a few minutes. I added some white wine, white vinegar, sugar and salt, and cooked for a few minutes longer until it was a nice, thick sauce.

Finally, I added the shrimp, stirred to coat and cooked, covered for a few minutes until the shrimp were done.

I served the shrimp and sauce over white rice, and topped it with chopped avacado and cilantro. This was a really delicious meal. The sauce was thick, sweet, smoky and flavorful. Even though there were no tomatoes in the recipe, it reminded me of a hearty arrabiata sauce. The flavor of the white wine came through as a noticible and pleasant element. I was a little dissapointed by the lack of heat in this dish. That, of course, is probably entirely attributable to my chile substitution, and could have been corrected with a sprinke of dried red pepper flakes or a dash of tobasco. The other thing that I was dissapointed by was the underripeness of my avacado garnish. That, also, is not the fault of The Book, but rather my own poor produce selection skilz.


Date Cooked: May 2, 2009
Degree of Difficulty: Easy (but this isn't a quick weeknight meal due to the extra time required to toast, seed and soak the dried chiles)
Rating: A-

*This recipe isn't online.

Wednesday, May 13, 2009

146. Indian Baked Rice (p. 258)

I don't think that I ever had Indian food until I was in college, but since then, I've loved it. Chicken tikka masala is definitely on my short-list of death-row meals. So, I'm glad that The Book has a number of Indian dishes for me to try as I work through The Project. This recipe was the first of The Book's Indian recipes that I've made, and I was pretty happy with it for the most part.

First I rinsed and drained some basmati rice in a few changes of cold water, then I set it aside to drain for a while. Next I heated some canola oil in my large Dutch oven and cooked some slivered almonds until they were golden. Or at least that was the goal. As usual, I let the almonds cook for just a few seconds too long, and many of them got overcooked. This is becoming a routine whenever The Book calls for toasting or frying anything. I always over-do it. I'll get the hang of it, eventually. I took the nuts out of the hot oil, and let them drain on some paper towels.

Next I cooked some onion in the hot oil, and added some garlic, jalapeno, grated fresh ginger, salt, and some of the garam masala I made. Then I added the rice and cooked it with the onion and spices for a little while. I added some chicken broth and cooked it on the stove for a bit and then covered it and moved it to the oven for a while longer. Once all of the liquid had been absorbed, I removed the rice from the oven and let it sit for a while. I sprinkled it with the fried almonds and served it with some garam-masala-rubbed grilled chicken breasts and some braised leeks.

This dish was good, but not great. The rice was a little dry, which might have been my fault. But the flavor wasn't as intense as I would have liked it to be. The scent and flavor of the garam masala was there, but it was a bit more subtle than it could have been. If you make this, I'd suggest using a heavy hand with the seasonings.


Date Cooked: April 26, 2009
Degree of Difficulty: Medium
Rating: B+

Thursday, May 7, 2009

145. Garam Masala (p. 932)

I made this recipe as a component of the Indian Baked Rice that I'll write about next.

Garam masala is a traditional Indian spice mixture that has many variations. The Book's version combines cardamom, cinnamon, cumin seeds, whole cloves, peppercorns and nutmeg.

Normally, I wouldn't go to the trouble of grinding my own spices, mostly because of the hassle. But after I smelled and tasted the results, I can certainly appreciate the difference between freshly ground spices, and a pre-ground spice mix that's been sitting in your cupboard for who knows how long and languishing on a supermarket shelf for who knows how much longer.

The preparation is pretty easy, just put all of the ingredients into a coffee/spice grinder (I had forgotten that I have one of these. Nice!) and whiz it until finely ground. The first ingredient is the cardamom. I'm sure that I've had foods that contain cardamom, but this was my first experience with the whole seeds and the pods that the seeds are packaged in. The first obstacle in dealing with cardamom is the price ... $16 for a jar of seed pods. I'm going to have to find some other cardamom recipes to make good use of leftovers. The next obstacle is getting the seeds out of the pods. Most of the pods were pretty papery and I could just peel them. Others were tougher and I needed to crush them with the side of a chef's knife to get the seeds out. But once that part was done, it was smooth sailing. Next I broke up a cinnamon stick, and added in the cumin seeds, whole cloves, peppercorns and nutmeg, and whizzed it all up.

The garam masala smells sweet, fruity with citrus and cedar notes. You can sense the individual scents of the cinnamon and cloves in waves, but no one single spice dominates. The smell is really out of this world. I was thinking that it would make a great scented candle. Are you listening, Yankee Candle Company?

Like I said, I made this garam masala for the Indian Baked Rice, but I also took The Book's advice to rub some of the leftover spice mix onto some boneless, skinless chicken breasts and threw them on the grill. They were great! A quick and delicious dinner.

Date Cooked: April 26, 2009
Degree of Difficulty: Easy
Rating: B+

Tuesday, May 5, 2009

144. Taco Salad with Salsa Vinaigrette (p. 164)

Let's be honest here. Taco salad is something you'd expect to find in an Applebee's menu, not in The Gourmet Cookbook. But there it is in The Book, and so, I made this recipe.*

This being Gourmet, however, The Book calls for you to make your own tortilla chips (although the headnotes say, with a bit of a judgmental sigh, that store-bought chips are "perfectly fine"). Really, though, the chips couldn't be easier. Just heat some vegetable oil (I used canola) until it's good and hot. While the oil is heating, cut up some corn tortillas into wedges with your kitchen shears. Then pop a handful of the wedges into the hot oil for a few seconds until they crisp up and start to change color (they go from golden to brown very quickly, so resist the temptation to wait just one more second). Drain the chips on some paper towels and sprinkle them with a little bit of salt. There's nothing better than fresh, warm tortilla chips. These could be a recipe on their own in The Book, and I could see myself making these again some day.

Other than the crisp tortillas, the other thing that makes a taco salad a taco salad is the seasoned taco meat. The Book calls for ground chuck, but because my wife "don't eat no meat" I used ground turkey. First, I heated a little bit of oil in a pan and added some chopped onion, garlic, cumin and chili powder and cooked until the onions were soft. Then I added the turkey and some tomato paste and cooked until the turkey was done.

While the meat cooled a little bit, I made the salsa vinaigrette. I blended together some garlic, vinegar, lemon juice, cumin, salt and pepper. With the motor running, I poured some olive oil through the top opening of the blender until it was nice and emulsified. Then I added some chopped tomatoes, chopped jalapeno and cilantro and whizzed it up some more. The result was a creamy-looking, celadon colored dressing.

To plate the salad, I laid out some romaine lettuce on a couple of plates, topped it with a mound of the taco meat, some fresh tomato wedges and a handful of the homemade tortilla chips. I also added some shredded cheddar cheese to mine (my wife is stil dairy/soy/gluten free), and drizzled the vinaigrette on top of the salad.

I liked this salad. The meat was good, but the dressing was the real star. Bright and pungent with the cumin and jalapeno, with a nice creamy texture. My wife said that the salad was good but, "basic." For crying out loud, I made homemade tortilla chips, and she called it "basic"?!? What she meant, was that the lettuce and tomato combo was "basic," and she would have liked to have seen some avacado and diced red and green peppers. Oh, yeah. That would have been a nice touch.

Date Cooked: April 25, 2009
Degree of Difficulty: Easy
Rating: A-

*This recipe is not on epicurious.com.

Sunday, May 3, 2009

Just a taste...

Mark your calendars. Julie and Julia, the Nora Ephron movie that combines Julia Child's My Life in France and Julie Powell's Julie and Julia, comes out on August 7.

The movie trailer just came out a couple of days ago, and it's our first glimpse of Meryl Streep channeling Julia Child. This is gonna be good.

Saturday, May 2, 2009

143. Cilantro Lime Shrimp (p. 46)

OK, I think I need a little lesson in shrimp anatomy, or at least in shrimp preparation. In order to make this recipe,* I bought a pound of frozen "deveined" shrimp. I thawed them in a bowl of ice water, and then I started to peel them. That's when I noticed the dark vein running down the inner curve of each shrimp. But wait, I though I had paid a couple of bucks extra to get "deveined" shrimp. What's the deal? Turns out that shrimp have two veins. One website I found called the vein on the outer curve the "sand vein" and the vein on the inner curve the "blood vein." Another website said that many people only take out the vein on the outer curve.

My shrimp had a slice down the outer curve of each shrimp, and the outer vein had been removed. The inner vein was still intact. I decided to take that one out, too. To I took a sharp, pointy paring knife and did some shrimp surgery. I made a thin slice down the inner curve of each shrimp and pretty easily removed the inner vein. But my question is, did I have to? I'd appreciate your thoughts about deveining.

With my shrimp fully deveined, I made some marinade. I mashed some garlic and salt together with my chef's knife to make a paste, and whisked that together with some fresh lime juice, orange marmalade, finely chopped fresh cilantro, olive oil, red pepper flakes, and salt and pepper. (The Book also calls for a little bit of soy sauce, but I left it out due to our current soy/wheat/dairy ban.) I reserved some of the marinade for a dipping sauce. I tossed the rest of the marinade into a zip-top bag with the shrimp. I let the shrimp marinate in the refrigerator for a little while.

Next, I drained the shrimp and patted it dry with a paper towel. I heated some oil in a skillet and sauteed half of the shrimp for a few minutes until they started to brown. I transferred them to a plate and cooked the rest of the shrimp.

This was a delicious way to eat shrimp. The citrus and cilantro flavors are bright and clean. The marmalade gives the shrimp a touch of sweetness and the red pepper flakes give just a hint of heat. We thought that they were just a bit greasy. Maybe the amount of oil in the recipe could be reduced?

This recipe is in The Book's hors d'oeuvres chapter. I could see these shrimp being served as a passed hors d'oeuvre at a cocktail party, but only if there were plenty of napkins. This is definitely a "finger lickin' good" shrimp. I think that a better use for this dish might be as part of a meal of "small plates" (i'm thinking non-Spanish tapas). It would also be great for dinner, served over rice, drizzled with the reserved marinade and accompanied by some crisp steamed vegetables, like snow peas. However you serve it, and you should, you'll enjoy this one.

Date Cooked: April 19, 2009
Degree of Difficulty: Medium
Rating: A-

*On epicurius.com, this recipe is called "Coriander Lime Shrimp." Same thing.