Sunday, June 7, 2009

156. Rhubarb Roulade (p. 720)

I was a little nervous about making this recipe. I've never made a jelly roll before, and I was sure that it was going to be a disaster. But just look at that picture! I don't mean to brag, but I think it came out pretty darn good.

The other thing that surprised me about this recipe (the first thing being that I could actually pull it off) was that I learned that the thing that I've been calling a cookie sheet all these years is actually a jelly roll pan. Who knew?

The Book says to make the cake first and to make the filling while the cake cooks. But, because I was so nervous about the cake, I decided to make the filling first and get that out of the way.

Rhubarb is in season now, so I knew I'd be able to find some. I looked first at my usual source for local produce, but they had just run out of rhubarb. The mega-mart had it, though. The filling is very simple. It's just some finely chopped rhubarb and sugar cooked down into a sweet/tart puree. Once that was ready, I put it in the refrigerator to cool while I made the cake.

First, I prepared the pan but buttering it, lining it with wax paper, and buttering it again and dusting it with flour. Next I beat together some egg yolks, sugar and vanilla. I cleaned the beaters and beat some egg whites and sugar until they held stiff peaks (or at least a close approximation of stiff peaks). Then in alternating batches, I folded some flour and the egg whites into the yolk mixture until it was all incorporated.

I spread the batter out onto the jelly roll pan. At first it didn't look like it was going to be enough batter to cover the pan, but with a little bit of patience and some gentle spreading with a rubber spatula, it worked out. I cooked the cake until it was "pale and dry to the touch."

Now the scary part. I took the cake out of the oven, covered with a kitchen towel (to keep in some of the humidity?) and let it cool for just a few minutes on a rack. Next I spread the filling on the cake (I took the towel off first ... duh). Then, very carefully, and with my wife's assistance, I began rolling the cake. As I rolled, I peeled the wax paper off the bottom of the cake and used it to help me roll the cake as tightly as I could without breaking it. I gently lifted the rolled cake off the pan an put it on a platter and let it cool completely.

The Book says that you can make the filling a day ahead of time. I actually made the whole cake a day ahead of time. I wrapped it in plastic wrap and kept it in the fridge over night, sprinkled it with confectioner's sugar just before serving, and it was great.

This was a delicious cake. Perfect for a spring or summer meal. The cake is light, tender and airy (and relatively low-fat! no butter). But the filling is the real star of this cake. It's bright and sweet with that distinctive rhubarb puckery-ness. And the color! A really nice cake, and not that scary after all.

Date Cooked: May 23, 2009
Degree of Difficulty: Medium
Rating: A-

Thursday, June 4, 2009

155. Spicy Lemon-Marinated Shrimp (p. 45)

How is The Book like Pvt. Benjamin Buford "Bubba" Blue? Well, as Bubba explained to Forrest Gump in one of the most memorable movie scenes ever, "shrimp is the fruit of the sea." And both Bubba and The Book know that shrimp can be prepared in innumerable delicious ways:
You can barbecue it, boil it, broil it, bake it, saute it. Dey's uh, shrimp-kabobs, shrimp creole, shrimp gumbo. Pan fried, deep fried, stir-fried. There's pineapple shrimp, lemon shrimp, coconut shrimp, pepper shrimp, shrimp soup, shrimp stew, shrimp salad, shrimp and potatoes, shrimp burger, shrimp sandwich. That- that's about it.
But, wait, there's more ... so far in The Project, I've made Cilantro Lime Shrimp, Shrimp in Adobo Sauce, Pad Thai, and now this recipe* for Spicy Lemon-Marindted Shrimp. And that's just the beginning. According to The Book's index, I've got twenty-five more shrimp recipes to make.

The Book says that this recipe is a new take on the classic Southern pickled shrimp. I've never had pickled shrimp, so this was new to me. But this spicy, tangy, briny preparation might just be one of my favorite ways of eating shrimp.

First, I took all of the zest off of a large lemon with a vegetable peeler. Then I squeezed the juice from the lemon and put it in a bowl with the zest. Next, I ground some coriander seeds in a spice grinder and added them to the bowl. I whisked it all up with some white wine vinegar, olive oil, water, sugar, and a whole lot of salt. Finally, I added some pepper flakes. The Book calls for Aleppo chili flakes, but says that "plain old red pepper flakes" are fine, too, so that's what I used.

Next, I added some pickling spices and a whole lot more salt to a pot of boiling water, and boiled some shelled, deveined shrimp for about 90 seconds until they were cooked through. (By the way, thanks for the advice on deveining. I bought "deveined" shrimp from the grocery store, but this time, I didn't remove the vein along the inner curve of the shrimp. I didn't notice any difference in the flavor, and it was a lot less work.) I drained the shrimp and let them cool a little bit.

Then, I put the shrimp in a zip-top bag with the marinade and let it sit in the refrigerator overnight (The Book says to marinate for at least eight hours and up to three days.) I drained the shrimp, put them on a platter and served them as a appetizer at my family's Memorial Day cookout. These shrimp were very tasty. Salty, but tasty. The flavors of the lemon and all of the pickling spices combined in zesty, sweet and sour, puckery deliciousness. I really enjoyed this one.

Date Cooked: May 23, 2009
Degree of Difficulty: Easy
Rating: A

* The recipe on epicurous.com feeds fify and calls for ten pounds(!) of shrimp. Unless you're a caterer, go with the recipe in The Book.

Tuesday, June 2, 2009

154. Cranberry Pistachio Biscotti (p. 685)

Before I made this recipe* from Italian baking authority Carol Field, I didn't know that the word biscotti was descriptive of the cooking method for these popular Italian cookies.

You see, biscotti comes from the Latin word biscoctum, meaning "twice-baked," and wouldn't you know, that's just how these cookies are made. For the first bake, the cookie dough is formed into a log and baked. For the second bake, the log is sliced into pieces and baked again until crisp and browned.

I started by soaking some dried cranberries in some boiling water to soften them a bit. Meanwhile, I buttered and floured a large baking sheet. To make the dough, I whisked some flour, sugar, baking soda, baking powder and salt. Then I beat in some eggs and vanila extract. Finally, I mixed in the cranberries and some shelled pistachios. I missed the part of the recipe that said to pat the cranberries dry after draining them. They were still pretty wet when I added them to the dough. It gave the dough an odd, wet, sticky texture. I was worried that I had ruined it, but it all worked out OK in the end. The Book says to turn the dough out onto a floured surface and knead. But because of the dough's stickiness (and my impatience) I just kneaded it right in the bowl.

I divided the dough in half and formed it into two logs. I brushed the logs and baked them until golden. I let them cool a bit and, with a serrated knife, cut the loaves into half-inch slices. I arranged the slices on a baking sheet and put them back in the oven for the second bake.

These biscotti were very good. Just the thing to go with an afternoon cup of coffee. The dominant flavor was the vanilla, which really came through. I would have liked even more cranberries and pistachios to make them even more flavorful. The texture was nice, but I agree with Teena that the second baking could have been longer, since these biscotti were not as crunchy as others I've had. All in all, these were delicious and easy to make. I would definitely make these again.

The Book says that the biscotti keep in an airtight container at room temparature for up to a week. According to Wikipedia, Pliny the Elder said that biscotti would last for centuries. I think that the reality is somewhere in between. I took a few of these biscotti with me to work every day for almost two weeks, and the last one was just as tasty as the first.

Date Cooked: May 17, 2009
Degree of Difficulty: Medium
Rating: A-

*This recipe is not on epicurous.com.

Saturday, May 30, 2009

153. Malaysian-Style Chicken Curry (p. 359)

Like a lot of people, when I go to Thai restaurants, I often go with the old standby, and order Pad Thai. Recently, I've ventured further afield in the menu choices, and I've become a fan of various curry dishes, especially green curry.

This recipe, from Malaysia, Thailand's neighbor to the south, reminded me of some of the better curries I've had at Thai restaurants.

First, I roughly chopped a whole lot of shallots, some garlic and ginger root. I pureed all of these ingredients in the food processor with a little bit of water to make a paste. A very pungent paste! When I took the lid off the food processor, the "fumes" from the shallots and garlic filled the kitchen and made my eyes water a little bit.

Next, I browned some boneless, skinless chicken breasts in my large Dutch oven. I transferred the browned (but not yet completely cooked) chicken to a plate. I turned the heat down and added the shallot/garlic/ginger paste, cooking for a bit and adding some curry powder. I returned the chicken to the pot and added a can of coconut milk and chicken broth. I also added a whole jalapeño chili, which I had made four slits in. Presumably, as the curry simmers, the jalapeño's heat gets infused into the sauce. I also added a cinnamon stick and one whole clove. The Book calls for one star anise, but my wife couldn't find any at the grocery store. She brought home some anise seed instead. At first, I said, it's not the same, but then I checked The Cook's Thesaurus, and learned that a 1/2 teaspoon of anise seed and a pinch of allspice will approximate a single star anise. I simmered it all together for a while until the chicken was cooked through. Then I took out the chicken and simmered the sauce for a bit longer to thicken. When I was done, I served the chicken and sauce over rice and sprinkled it with some fresh clinatro.

This is one of the best meals I've made from The Book so far. The chicken was so tender and flavorful. The sauce was fragrant and delicious. The coconut milk gave it just a touch of sweetness and a rich, velvety texture. The jalapeño and the other spices gave the dish a multi-layered flavor with just the right amount of heat (OK, I wouldn't have minded just a bit more heat). Even the cilantro on top wasn't just for looks. It perfectly finished off the dish with a bright clean note.

This dish remineded me of an excellent green curry that I get at a local Thai restaurant called Sweet Basil in Andover, Massachusetts. I will certainly make this dish again. It's a real keeper.

Date Cooked: May 17, 2009
Degree of Difficulty: Medium
Rating: A

Thursday, May 28, 2009

152. Prosecco and Summer Fruit Terrine (p. 811)

When I first flipped through The Book, I spotted this recipe and decided that it would be a perfect Mother's Day dessert, so I filed it away in my memory bank. Well, this Mother's Day, we had a party for my son's dedication ceremony, and this fruit terrine fit in just right with the lunch buffet, and it was a nice alternative to the cake that we got from the bakery down the street.

First, I arranged four cups of mixed fruit in a 1 1/2 quart glass loaf pan. The Book suggests berries, peaches and grapes. I planned on using blueberries, peaches and white seedless grapes. It used to be that you could only get fresh "summer fruit" in, well ... summer. But, these days, you can get pretty much anything at pretty much any time. For the past few weeks, I've seen fresh peaches at my usual grocery store. But, of course, when I did my shopping for this recipe ... you guessed it, no peaches. (And, wouldn't you know it, the next week, they had hundreds of fresh peaches! Go figure.) So, with no fresh peaches, I had to improvise. I scanned the produce section to try to find a combination of fresh fruit that would go well together with each other and the prosecco. I wasn't really happy with any of the options, so I decided to go with canned peaches. I also decided to use some canned pears, too.

Next, I sprinkled some unflavored gelatin over some prosecco and let it stand for a little while in a small bowl. Then I boiled some more of the prosecco with some sugar and mixed it until the sugar is dissolved. I took it off the heat and added the gelatin mixture and stirred until dissolved. I added yet some more prosecco and some lemon juice and transferred the whole thing to a metal bowl set over a larger bowl full of ice. I allowed the mixture to cool to room temperature, stirring every now and then. This sounds like a lot of steps, but it was really easy and only took a few minutes.

I carefully poured the prosecco/gelatin/sugar mixture over the fruit, covered it with plastic wrap, and put it in the refrigerator overnight to set (The Book says that it needs at least six hours to set). The next day, just before serving, I unmolded the terrine by dipping the glass loaf pan in a larger pan of hot water to loosen it. It took a few tries, but eventually, the terrine slid out of the pan and onto the serving plate.

This dessert makes a stunning presentation. It is a colorful, mosiac of jewel-like fruit. Unfortunately, I wasn't as impressed with the serving and eating. First, there was so much fruit in the terrine and not enough of the prosecco gelatin that it didn't really keep its structural integrity when sliced. It wasn't a matter of the gelating not setting, it's just that there wasn't enough of it to hold the slices together. But worse, the flavor was only ho-hum. I had such great expectations for this dessert, and it didn't really live up.

Date Cooked: May 9, 2009
Degree of Difficulty: Easy
Rating: B+

Monday, May 25, 2009

151. Hummus with Toasted Pine Nuts, Cumin Seeds, and Parsley Oil (p. 14)

The Book introduces this recipe by saying that "Hummus is so common these days it's become almost pedestrian." To me, this sounds a bit snobbish. It's kind of like those hipsters who claim not to like bands like Coldplay now that they have top-selling albums and sell out big arena shows. If you liked the band before they were popular, it's OK to keep on liking them once everyone else catches up to your superior trend-spotting skills. You don't have to apologize for liking something that everybody else likes. And you certanly don't have drizzle parsley oil all over your Coldplay CD and sprinkle toasted pine nuts, cumin seeds and parsley on it. You'll just wreck it.

At its core, this is just a basic recipe for very good hummus. First, I whizzed together some canned chickpeas and garlic in the food processor. Then I added some well-stirred tahini paste, water, lemon juice, olive oil, salt and more chickpeas, and whizzed it all together until it was smooth. Delicious! This is where I'll stop the next time I make this recipe.

The rest is all gilding the lily, especially when you do it all at the same time. Any one of the following accouterments on its own might be a nice little change, but all together, it's a bit much.

First, I blended equal parts of olive oil and chopped parsley in the blender. I poured this into a fine-mesh sieve and pressed the bright green oil from the solids. This parsley oil was was really good. It had a very fresh, almost grassy flavor. I'm sure that I'll find a use for this in some other dish that I make somewhere along the way.

Next, I toasted some pine nuts and cumin seeds in the oven. Toasting nuts and seeds is alwys dicy. They go from toasted to incinerated in the blink of an eye. The pine nuts were just a smidge "toastier" than I would have liked, but they were OK.

I sprinkled the toasted pine nuts and seeds over the hummus and dirzzled the parsley oil over the top. I didn't even take the last sept of scattering parsley leaves over the top of the whole thing. It was all just too much. This is an excellent basic hummus recipe. All of the "tarting-up" is good, but completely unnecessary. I just think that the editors of Gourmet "out-Gourmet-ed" themselves on this one.

Date Cooked: May 9, 2009
Degree of Difficulty: Easy
Rating: A-

Saturday, May 23, 2009

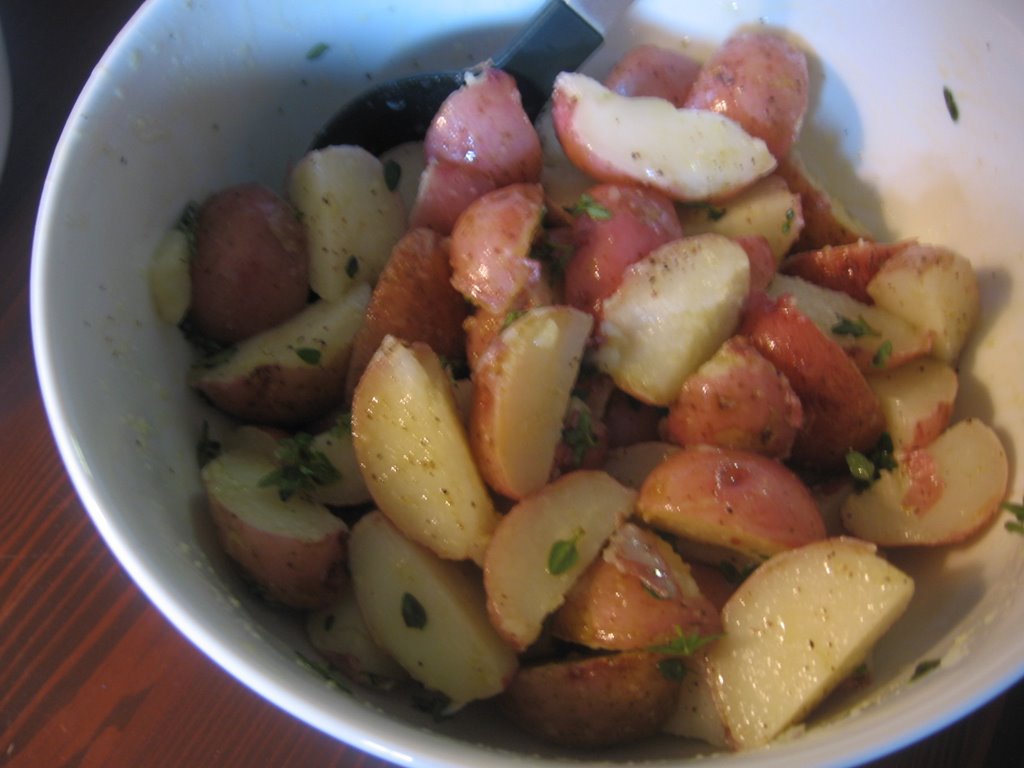
150. Potato and Thyme Salad (p. 148)

I made this potato salad as part of the lunch buffet for my son's dedication ceremony celebration on Mother's day. I was looking for an easy, make-ahead side dish that would go with the marinated turkey breast that I was making, and that would work with my wife's current dietary restrictions (no dairy, soy or wheat). This fit the bill.

The Book says that this is "no suburban backyard potato salad." Instead, this recipe,* which comes from the Ballymaloe Cooking School in Ireland, is simple, understated and totally unfussy. It's so simple that there are only three ingredients: small red boiling potatoes, fresh thyme leaves, and olive oil (plus salt and pepper to taste).

First, I washed and dried some fresh thyme. I plucked the leaves and buds off the woody sprigs. This what kind of tedious, but not too hard since you can sort of zip the leaves off the sprigs by running your fingers against the direction that the leaves grow. Once I had gathered a respectable amount of leaves, I put them in a little bowl and set them aside.

Next, onto the potatoes. I washed them well and put them (whole) into a pot of salted water. The Book says to cook the potatoes for 15 to 20 minutes until "just tender." I've had my fair share of undercooked potatoes (they're pretty much inedible) so, I made sure that they were good and tender. In retrospect, I wish that I had taken them off the heat just a little bit sooner, since what you're looking for here are potatoes that are cooked, but still just the slightest bit on the firm side.

After the potatoes had cooled just a bit, I cut them into quarters, sprinkled them with the thyme leaves, drizzled on the oil and tossed to coat. I seasoned it with some salt and pepper, and that was it.

My wife didn't like this dish at all. She called it "the worst potato salad I've ever had," and demanded that I give it a "C" rating. (Geez, tell me how you really feel.) I didn't have quite as negative reaction to this recipe. I just thought that it was kind of "meh." I suppose that "understated" and "boring" are two ways to look at the same thing.

(Oh, by the way, in all of the hustle and bustle of getting ready for the lunch, I forgot to take a picture of this dish. The photo at the top of this post comes from Teena's blog. I hope she doesn't mind me borrowing her picure ... because I'm going to do it again with my next post, too.)

Date Cooked: May 9, 2009
Degree of Difficulty: Very easy
Rating: B-

* This recipe is not on epicurious.com.